BuddytheReow
Breadboard Baker
Hey y'all,
TL/DR, I made a cooler looking pedalboard from my first version.
About 6 months ago I went through the journey of making my own pedalboard instead of working on just a simple wood plank with wires everywhere. If you're interested in my original journey you can read about it here.
 forum.pedalpcb.com
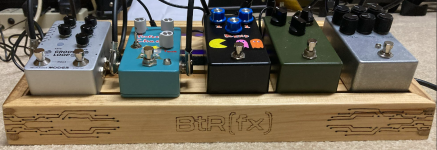
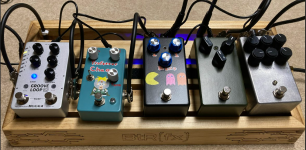
Since I build the original one, I've been playing a lot more bass. Like, a lot. So much that I haven't really picked up a guitar in a number of months and when I do it feels weird. I've put together a few pedals that really shine on bass, so It was time to go through the journey of building another one. This one is smaller, since bass traditionally doesn't use a whole lot of effects. Think compressor, octave, and maybe some dirt. It can hold (5) 125b pedals, which is more than plenty.
Throughout this whole project, many mistakes were made, many new techniques and skills were used, and many lessons learned. I still had a lot of fun building this even though I was battling COVID toward the end (COVID's still a thing, i guess?)
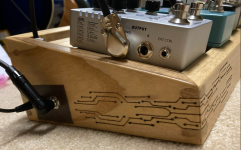
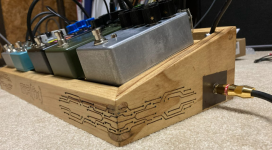
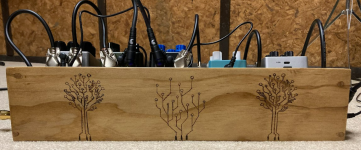
Anyways, from the first project I realized I didn't want butt joints since they don't take stain as evenly as the rest of the board. To counter that? Miter joints. The problem with miter joints is that they're not super strong, although they look nice. I also wanted a wedge design rather than a flat pedalboard, because why not. Using my cheap/borrowed table saw and miter saw I was able to make the carcass. So, how do I reinforce the miter joints? Dowels. I realized about halfway through drilling the holes out that I made them waaaay too close to the corners and took a lot of chunks out of the wood. Naturally, I can't have these exposed and needed to fill them in somehow. All I had on hand was a container of plastic wood, which is great when you're going to paint over it. Stain not so much. But I still used it. Now, how to I take the eye away from the dowels? This one I thought about for a day or so. Then it dawned on me....woodburning. We were given a basic kit a number of months ago and I finally took it out of the box and played around with it for an evening to get the feel for it. I wasn't happy with the tip that came with it and realized that all this is is a soldering iron. So, I dig up my old one with a bunch of tips and went on the journey of burning some neat designs into this pedalboard. When woodburning, patience is definitely your friend here and took about a day or two off and on to put the designs on. A quick stain sesh and 3 coats of poly and she's finally ready for the electronics.
I bought a chinese "isolated" power supply (you know, the ones with 10 outputs) and mounted it underneath. In my first project it got mounted with velcro, which really isn't working out, but gets the job done. This power supply can be screwed in and was the main selling point for me. All the patch cables are DIY and am relatively please with how these turned out considering how simple it is to make one. Shout out to @fig for some extra instrument cable to help the cause. Credit where credit is due.
Anyways, here she is. Buddy's Pedalboard 2.0 - now in Bass flavored!
TL/DR, I made a cooler looking pedalboard from my first version.
About 6 months ago I went through the journey of making my own pedalboard instead of working on just a simple wood plank with wires everywhere. If you're interested in my original journey you can read about it here.
Buddy's Pedalboard
Hey everyone, I am starting on the journey to build my very first actual pedalboard! What I currently have is a piece of MDF board that was taken from an old computer desk that my folks have in their attic. That's it, literally just a board. To counter my pedals from shifting around I installed...
Since I build the original one, I've been playing a lot more bass. Like, a lot. So much that I haven't really picked up a guitar in a number of months and when I do it feels weird. I've put together a few pedals that really shine on bass, so It was time to go through the journey of building another one. This one is smaller, since bass traditionally doesn't use a whole lot of effects. Think compressor, octave, and maybe some dirt. It can hold (5) 125b pedals, which is more than plenty.
Throughout this whole project, many mistakes were made, many new techniques and skills were used, and many lessons learned. I still had a lot of fun building this even though I was battling COVID toward the end (COVID's still a thing, i guess?)
Anyways, from the first project I realized I didn't want butt joints since they don't take stain as evenly as the rest of the board. To counter that? Miter joints. The problem with miter joints is that they're not super strong, although they look nice. I also wanted a wedge design rather than a flat pedalboard, because why not. Using my cheap/borrowed table saw and miter saw I was able to make the carcass. So, how do I reinforce the miter joints? Dowels. I realized about halfway through drilling the holes out that I made them waaaay too close to the corners and took a lot of chunks out of the wood. Naturally, I can't have these exposed and needed to fill them in somehow. All I had on hand was a container of plastic wood, which is great when you're going to paint over it. Stain not so much. But I still used it. Now, how to I take the eye away from the dowels? This one I thought about for a day or so. Then it dawned on me....woodburning. We were given a basic kit a number of months ago and I finally took it out of the box and played around with it for an evening to get the feel for it. I wasn't happy with the tip that came with it and realized that all this is is a soldering iron. So, I dig up my old one with a bunch of tips and went on the journey of burning some neat designs into this pedalboard. When woodburning, patience is definitely your friend here and took about a day or two off and on to put the designs on. A quick stain sesh and 3 coats of poly and she's finally ready for the electronics.
I bought a chinese "isolated" power supply (you know, the ones with 10 outputs) and mounted it underneath. In my first project it got mounted with velcro, which really isn't working out, but gets the job done. This power supply can be screwed in and was the main selling point for me. All the patch cables are DIY and am relatively please with how these turned out considering how simple it is to make one. Shout out to @fig for some extra instrument cable to help the cause. Credit where credit is due.
Anyways, here she is. Buddy's Pedalboard 2.0 - now in Bass flavored!


