MichaelW
Well-known member
- Build Rating
- 5.00 star(s)
Hard for me to resist yet another D style pedal.
I'd never heard of this pedal before and TBH didn't look into it too much before ordering the board.
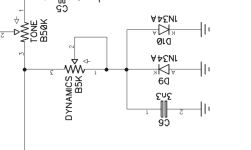
When I took a closer look at the schematic, it's essentially a stripped down Zen drive with a boost.
The clipping is solely a pair of red LEDs.
After building it out and firing it up, it didn't sound anything remotely Dumble to me. It sounded like a YATS with LED clipping.
I'm kinda with @HamishR on the subject of red LED clipping. Really the only red LED clipping circuit that I really like is the Snozzberry drive.
Otherwise I'm finding them to be rather mundane.
So I decided to do some mods to the pedal and replace the LED clipping with the Zen Drive clipping circuit. (Mosfet/Ge/Bat41).
It's not very pretty but it works and sounds much better to me now. So now it sounds like a........stripped down Zen with a boost....
But it actually sounds pretty darn good.
It's a bit of a one trick pony as the tone control doesn't do much. The gain control also doesn't do much. It's like they were trying to hit a sweet spot
and narrowed it down to that.
Unlike the Zen with the low mid contour and more usable tone range, there's not a lot of variety from this pedal. But it does what it does really nicely.
Initially I was a little underwhelmed but after playing with it for a few days I've been drawn to it and really enjoying it.
Tight fit to get a dual footswitch build into a 1590B. If I were going to have this on a pedal board, I'd build it in a 125B for a bit more room for the bypass and boost switches.
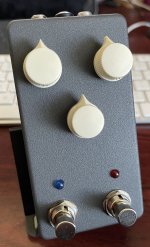
This is the gut shot of the build before my mods.
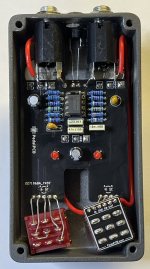
Then after my mods with the Zen clipping circuit. I used 2N7000 MOSFET's and an ITT Red Band Ge plus ST Micro BAT41's.
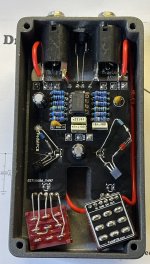
I also wanted to mention the new 1590B Top Jack drill template that @Robert was kind enough to send me.
I've used it a couple of times now and it works great for Lumberg jacks, or open frame jacks like Switchcraft or any of the Switchcraft clones.
However, since moving to the "slim profile" stereo jacks from AES I've had to adapt my top jack drill pattern a bit since the jacks stick out more and need to clear the back of the pots.
So for using open frame or Lumbergs, this is how I would use it.
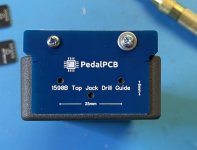
For using the Slimline Jacks that I've gone to for 1590B builds, I have to scoot everything down (or up) by 3-4 mm.
I made some marks on the drill template to index this.
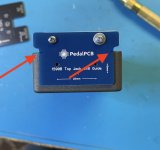
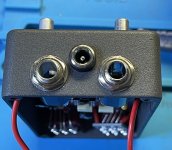
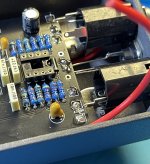
Just barely clears the back of the pot with no condom.
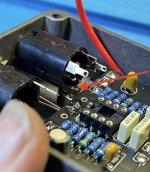
Also keep in mind, that the top jack template is for spacing out the jacks and power jack. But you still need to move the potentiometer pattern down from the top of the pedal by 7-9mm for most PCB's to accommodate the jack/plugs not hitting the board.
If this sounds confusing you can reference my original Top Jack layout post.
I'd never heard of this pedal before and TBH didn't look into it too much before ordering the board.
When I took a closer look at the schematic, it's essentially a stripped down Zen drive with a boost.
The clipping is solely a pair of red LEDs.
After building it out and firing it up, it didn't sound anything remotely Dumble to me. It sounded like a YATS with LED clipping.
I'm kinda with @HamishR on the subject of red LED clipping. Really the only red LED clipping circuit that I really like is the Snozzberry drive.
Otherwise I'm finding them to be rather mundane.
So I decided to do some mods to the pedal and replace the LED clipping with the Zen Drive clipping circuit. (Mosfet/Ge/Bat41).
It's not very pretty but it works and sounds much better to me now. So now it sounds like a........stripped down Zen with a boost....
But it actually sounds pretty darn good.
It's a bit of a one trick pony as the tone control doesn't do much. The gain control also doesn't do much. It's like they were trying to hit a sweet spot
and narrowed it down to that.
Unlike the Zen with the low mid contour and more usable tone range, there's not a lot of variety from this pedal. But it does what it does really nicely.
Initially I was a little underwhelmed but after playing with it for a few days I've been drawn to it and really enjoying it.
Tight fit to get a dual footswitch build into a 1590B. If I were going to have this on a pedal board, I'd build it in a 125B for a bit more room for the bypass and boost switches.

This is the gut shot of the build before my mods.

Then after my mods with the Zen clipping circuit. I used 2N7000 MOSFET's and an ITT Red Band Ge plus ST Micro BAT41's.

I also wanted to mention the new 1590B Top Jack drill template that @Robert was kind enough to send me.
I've used it a couple of times now and it works great for Lumberg jacks, or open frame jacks like Switchcraft or any of the Switchcraft clones.
However, since moving to the "slim profile" stereo jacks from AES I've had to adapt my top jack drill pattern a bit since the jacks stick out more and need to clear the back of the pots.
So for using open frame or Lumbergs, this is how I would use it.

For using the Slimline Jacks that I've gone to for 1590B builds, I have to scoot everything down (or up) by 3-4 mm.
I made some marks on the drill template to index this.


Just barely clears the back of the pot with no condom.

Also keep in mind, that the top jack template is for spacing out the jacks and power jack. But you still need to move the potentiometer pattern down from the top of the pedal by 7-9mm for most PCB's to accommodate the jack/plugs not hitting the board.
If this sounds confusing you can reference my original Top Jack layout post.


