Epoxy pour finish

SchlegFace

Active member
Hey all, quick question for anyone who has finished an enclosure with epoxy. I'm planning to do a sticker collage on the pedal and then coat over the top with epoxy. I'm trying to decide if I should drill out the enclosure before or after I pour the epoxy top coat. Anyone with previous experience and advice would be appreciated. Thanks!!
 
Never had experience with this but everything is telling me to drill the holes first then pour the epoxy.
Ditto. I would assume drilling afterwards would impact the adhesion around the holes, giving a clouded look from the resulting air gap. The enclosure heating up from the drilling might not be great for the epoxy too, depending on the formulation. Not to mention you’d be more likely to scratch the epoxy if you drill after the pour.
 
Ditto. I would assume drilling afterwards would impact the adhesion around the holes, giving a clouded look from the resulting air gap. The enclosure heating up from the drilling might not be great for the epoxy too, depending on the formulation. Not to mention you’d be more likely to scratch the epoxy if you drill after the pour.
I was thinking that same thing the epoxy would get cloudy after drilling thru it..my thought was the heat from the drilling would be the culprit.
 
Definitely drill first then put strong tape on the backs of the holes from the inside. When you pour the envirotex use a little wooden stirrer to fill the holes first and that way you won't get any flow marks from it running through the holes.

Once it's set leave it a few days to fully cure and then use a stepped drill bit to drill out the envirotex. If you use a regular drill bit or try and drill an enclosure after pouring the bit will lift the envirotex off the enclosure.

Juan Solo and Cleggy over on Madbean did the definitive guide for envirotex. I'll post it later for you after I get home.

Edit - Looks like I already posted this in a different thread. If you follow this you should get a pretty good finish. The only things I'd add is make sure you don't have high humidity or you might end up getting some blushing (weird rainbow effect like petrol poured on water). In winter I leave a dehumidifier going in the room when they cure.

 
Last edited:
@SillyOctpuss Thanks very much for the link and tips! This all makes perfect sense. No need to worry about the humidity in my house right now, having the heat on all the time keeps it bone dry unfortunately.

Thanks to everyone else for their advice and opinions. I was figuring drill first was the way to go, so your comments help reassure that I was on the right track.
 
Definitely drill first then put strong tape on the backs of the holes from the inside. When you pour the envirotex use a little wooden stirrer to fill the holes first and that way you won't get any flow marks from it running through the holes.

Once it's set leave it a few days to fully cure and then use a stepped drill bit to drill out the envirotex. If you use a regular drill bit or try and drill an enclosure after pouring the bit will lift the envirotex off the enclosure.

Juan Solo and Cleggy over on Madbean did the definitive guide for envirotex. I'll post it later for you after I get home.

Edit - Looks like I already posted this in a different thread. If you follow this you should get a pretty good finish. The only things I'd add is make sure you don't have high humidity or you might end up getting some blushing (weird rainbow effect like petrol poured on water). In winter I leave a dehumidifier going in the room when they cure.
This is where I learned it, too.
 
Drill both. I drill holes before. Usually you tape the holes before pouring, so they get filled and covered with epoxy, so drill again to get the epoxy out of the holes. I found using a slow drill, like for a screwdriver, goes better for drilling through the epoxy without causing it to lift off the surface.
 
All of the above and as spi said, I’ve had the best results with a step bit, not too heavy pressure, and slow speed. You don’t want the bit biting in too aggressively. I slowly skim it down. One thing I will add that for some reason seems to help, don’t know why, is I’ll dimple the tape down in the hole. I use blue painters tape and rub it down really good on the inside around the perimeter of the hole. Then I’ll take something that’s smaller in diameter than the hole, smooth and rounded. From the outside of the enclosure, use slight downward pressure in little circles to create a sort of bowl-like depression in the tape. Like each hole is a bowl. Then like mentioned above fill holes first with a stir stick first. Good luck. It took me a handful of tries before I got consistent results. Every once in a while I still dig in a little too hard and pull it up from the enclosure.
 
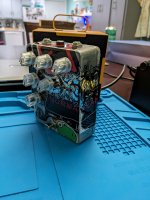
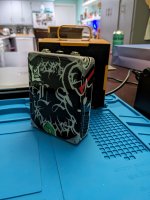
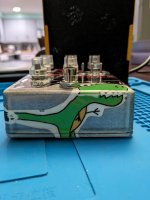
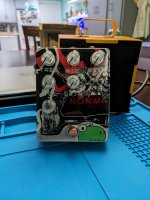
After quite a while, I have finally finished my pedal with the epoxy pour finish. I definitely benefited greatly from all of the advice you all provided, so thank you very much!!! I saved a bunch of band stickers from the case of my first computer, and one of a dinosaur I drew. I wanted to reuse them somehow, so the obvious choice was a pedal. The pedal itself is the PCB Guitar Mania "Amped S-bass", which is just the Baja Ampeg SVT pedal. The circuit actually works, which I was leery about, so I am glad I didn't have to remake on vero. Would I recommend building it, for the sound YES!, but I would advise to make your own drilling template. The pots were not properly spaced, so I had to do some bending of legs. Also, I used Lumberg jacks, and even those barely fit in above the board. Oh well, its together and works. Anyway, the finish! I poured over the top and sides and the bottom plate. This was a bit tricky, but I brushed a lot on and took my time with small coats, sanding in between. Drilling out the holes was a bit nerve wracking, but with the info from you all it was definitely easier. I just made sure when I got comfortable with it not to start going to fast. It is not perfect, but it works well enough for me. Will I do another epoxy pedal? Probably not, but at least I know how if I have to. Thanks again for all the help! Now I will shut up and let you see some pictures!

pedal front.jpg Pedal right.jpg Pedal back.jpg Pedal bottom.jpg
 
Looks awesome!

I don’t think I’m going to try any epoxy coats, but I was excited to find out that transparent dymo-labels exist! I’d never seen those and they look great!
 
Looks awesome!

I don’t think I’m going to try any epoxy coats, but I was excited to find out that transparent dymo-labels exist! I’d never seen those and they look great!
I think I got an off brand color pack on Amazon. They look pretty good IRL. Bonus of the epoxy pour, the labels aren't going to fall off any time soon!
 
Last edited:
The process of punching those letters out is always fun, and I like the look of them.

I labelled a bunch of toolbox drawers with them a while back and half of them fell off, so I never tried putting any on pedals, but you’re right- epoxy solves the adhesion problem.
 
I labelled a bunch of toolbox drawers with them a while back and half of them fell off, so I never tried putting any on pedals, but you’re right- epoxy solves the adhesion problem.
I had the same problem with the dymo labels on my parts bins. I’ve seen some that’s marketed as extra strength adhesive, so I’ll report back on how they hold up if I try those.
 
That looks really good @SchlegFace. I only do the tops of my pedals with epoxy now. I've tried the sides in the past but always ended up with weird flow marks and used a ton of epoxy.

Once you get used to it it's a pretty easy system which doesn't take that long to do (apart from the curing time). It also gives a level of gloss I haven't found with anything else.
 
Back
Top