paulcalypse
Active member
- Build Rating
- 5.00 star(s)
The Build
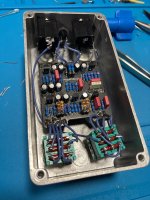
This build was pretty straightforward. A few odd resistor values needed to be ordered as I fill out my inventory. I did NOT test the gain on my 2N5088 stock (see this post), so just flying blind there. I used D2V diodes instead of 1N34A. I’m building a second one so I will compare later. The thing is so noisy and wild—not sure how much transistor gain or diodes will matter. [will update later]
For the 3nF capacitor, I purchased some 0.0027 uF at 10% tolerance and was able to find a 3nF.
I think I would prefer the dual foot switches to be closer to each opposing edge of the enclosure (more like CBA), so if you have the means to tweak the drill template, consider your options.


The Etch
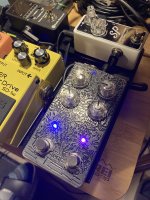
This is the second pedal I’ve etched. I absolutely love how it turned out. I tried documenting my entire etch process so I (and maybe you?) can recreate it. Here’s a picture. Click spoilers for the process and pictures/videos.
Link to Google Photos album containing these photos and videos
Problems and Pitfalls
Hit a couple speed bumps during this build. Soviet diodes might be labeled backwards, so test them. Also, the signal is on the tip, so wire your jacks correctly, lol. This board didn't have labels for IN and OUT, but now I understand true bypass switching after pondering why things weren't working. In fact, all problems I encountered during this build were solved away from the bench as I unconsciously retraced my steps. Sometimes stepping away and doing something else (like watching the Barbie movie with your spouse on a Friday night) will help you think through what went wrong.
Sounds
Tasting notes: spitty, rude, octave-like, weird. This fuzz has a lot of range, and I was really impressed. It's fun to tweak knobs and play to the fuzz, playing into the decay and zipper-like sounds at the high range on the sustain knob. The blend knob that gives the circuit its namesake can add some playing definition into your arpeggios, laying a sharp, manageable bed of fuzz under your playing. You will have to adjust the level knob to compensate for changing the blend setting; keep that in mind. Speaking of compensating, the knobs all seems to interact in a way, resulting in different effects with the boost switch. Sometimes the boost will provide a huge mid-hump relative to the current unboosted setting. You CAN dial in a tone that will allow the boost to boost, but other settings might result in the boost actually making the perceived signal quieter.
The Fifth Knob: Your guitar's volume knob. THIS is where the fun is, imho. Attenuating your input signal leads to some wild Octavia, ring mod freakout sounds. I just love it. I tried to demo this in my sounds below. Very interactive, very fun
60 cycle hum: cheap single coils (like my guitar)? You are going to hear a buzz when not striking notes. At least on this example. I tried recording my demos on a middle position to eliminate this noise. [[Edit 10/11/23 - I think I have some wider grounding issue in my play space in the basement. Could be exacerbating the hum issues. Thought I'd note.]]
Thanks for reading. Thanks for listening. Happy soldering.

This build was pretty straightforward. A few odd resistor values needed to be ordered as I fill out my inventory. I did NOT test the gain on my 2N5088 stock (see this post), so just flying blind there. I used D2V diodes instead of 1N34A. I’m building a second one so I will compare later. The thing is so noisy and wild—not sure how much transistor gain or diodes will matter. [will update later]
For the 3nF capacitor, I purchased some 0.0027 uF at 10% tolerance and was able to find a 3nF.
I think I would prefer the dual foot switches to be closer to each opposing edge of the enclosure (more like CBA), so if you have the means to tweak the drill template, consider your options.


The Etch
This is the second pedal I’ve etched. I absolutely love how it turned out. I tried documenting my entire etch process so I (and maybe you?) can recreate it. Here’s a picture. Click spoilers for the process and pictures/videos.
- Design in Adobe Illustrator. Use 2pt lines for cutouts. I used 1pt here and they were tough to clean up for the etch.
- Bare enclosure - sand top surface. Do not sand sides. 800 grit sand on block. Dip in water. 400 strokes north south. Dip enclosure in water. 1000 grit sand on block. Dip in water. 400 strokes north and south.
- Clean with acetone and paper towel.
- Line up print, tape down with kapton tape.
- Cotton rag over enclosure.
- Set 10 minute timer. Plug in iron on high. Place iron on enclosure (cold). Once the auto-off triggers (on my stupid iron) it takes a minute or so after reaching high heat, power cycle iron. Begin moving it slowly around enclosure to distribute heat. Continue power cycling iron when it auto-offs. Keep moving.
- When 2 min remain: Begin applying strong iron pressure along edges of enclosure. Then return to center. Still moving to distribute heat.
- After 10 minutes remove iron. Let enclosure cool a little. I dripped water on it right away and the paper started boil and cause bubbles. Luckily, I was able to touch up the toner with a sharpie. Score surface of print with exacto blade (not sure if this did anything). Distribute water to saturate.
- Soak under slow tap water, rubbing the paper off. Don't rush this. Use soft tooth brush to clean up any paper so only toner remains. This takes awhile.
- Nail Polish to mask edges. Masking tape will not work well on the rounded edges of the enclosure. It will stick to the flat side though. I masked with U haul packing tape. Next time I'll use something different (stickier?)
- 9 min ferric chloride soak with constant agitation. Enclosure got nearly too hot to handle by 8 min mark.
- Acetone and paper towel to clean. Ultra fine grit steel wool. Lacquer-Stik fill in paint black, dry for several days in 50% humidity basement. Two layers of clear coat from can. Baked for 30 min at 150 deg but oven probably ran closer to 160-170 deg.
Problems and Pitfalls
Hit a couple speed bumps during this build. Soviet diodes might be labeled backwards, so test them. Also, the signal is on the tip, so wire your jacks correctly, lol. This board didn't have labels for IN and OUT, but now I understand true bypass switching after pondering why things weren't working. In fact, all problems I encountered during this build were solved away from the bench as I unconsciously retraced my steps. Sometimes stepping away and doing something else (like watching the Barbie movie with your spouse on a Friday night) will help you think through what went wrong.
Sounds
Tasting notes: spitty, rude, octave-like, weird. This fuzz has a lot of range, and I was really impressed. It's fun to tweak knobs and play to the fuzz, playing into the decay and zipper-like sounds at the high range on the sustain knob. The blend knob that gives the circuit its namesake can add some playing definition into your arpeggios, laying a sharp, manageable bed of fuzz under your playing. You will have to adjust the level knob to compensate for changing the blend setting; keep that in mind. Speaking of compensating, the knobs all seems to interact in a way, resulting in different effects with the boost switch. Sometimes the boost will provide a huge mid-hump relative to the current unboosted setting. You CAN dial in a tone that will allow the boost to boost, but other settings might result in the boost actually making the perceived signal quieter.
The Fifth Knob: Your guitar's volume knob. THIS is where the fun is, imho. Attenuating your input signal leads to some wild Octavia, ring mod freakout sounds. I just love it. I tried to demo this in my sounds below. Very interactive, very fun
60 cycle hum: cheap single coils (like my guitar)? You are going to hear a buzz when not striking notes. At least on this example. I tried recording my demos on a middle position to eliminate this noise. [[Edit 10/11/23 - I think I have some wider grounding issue in my play space in the basement. Could be exacerbating the hum issues. Thought I'd note.]]
Thanks for reading. Thanks for listening. Happy soldering.
Last edited:

