Silver Blues
Well-known member
- Build Rating
- 5.00 star(s)
I've been at the pedal building game for quite some time now, and I feel like I've come a huge way from my dad helping me solder up my very first Big Muff (love you, Dad) wherein I overpaid for every component, didn't understand the concept of positive ground and built it with 2N5087s, and burdened it with a completely shit purple rattle-can paint job. After having discovered the magic of PCBs, UV printing services, powdercoating, etc., seeing some of my more recent builds next to the older ones was making several of the older ones look pretty sad. With that in mind, I thought it might be a nice exercise to revisit a few of my older builds with a fresh, more experienced perspective, and bring them up to today's version of my standards.
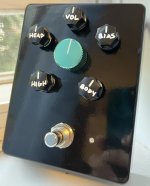
The first victim of this improvement quest is my Fuzzhugger Doom Bloom clone. Here's the original build:


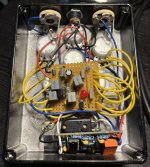
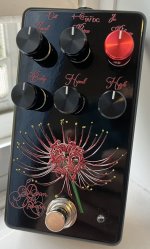
I built this back in 2017 on veroboard, and honestly it's not that bad, but hindsight has made it obvious that there was absolutely no need for a 1590BB-sized enclosure for this tiny circuit, and the plain black Tayda enclosure and hand-drawn labels aren't the prettiest or most interesting look for a pedal that I really like. I of course used the PPCB Death Cap PCB for this build. Although I've used UV printing services before - namely AmplifyFun and Obscura MFG, both highly recommended - I had never used Tayda's service, mostly because I was sort of deterred by the strict rules, apparent specificity for Adobe Illustrator, and lack of support in preparing the artwork. Seeing how the service had improved over time and finding excellent tutorials from people on this forum detailing how Inkscape and Scribus could be used to effectively prepare artwork to Tayda's standards, I decided I'd use this build to test out Tayda's drill and UV printing service. So, through the magic of Retrospective, we obtain the New and Improved Doom Bloom:


I thought that "Doom Bloom" invoked imagery of some sort of poisonous plant, but one that looked beautiful despite its danger. An alternate interpretation might be a flower that appears before or after some great disaster, like the first new life after a wildfire, or something like that. Searching for something that reflected these ideas, I found a great blog post by Adrian Storey describing the symbolism of lycoris radiata, the red spider lily:
"Highly posionous, the bulbs contain toxic alkaloids that if ingested cause paralysis of the central nervous system and ultimately death. For this reason they were often, in pre cremation times, planted in graveyards to prevent wild animals eating the corpses."
"In Japanese mythology it is the flower that grows along the banks of the river that one must cross after death or the flower that grows in hell."
Perfect.
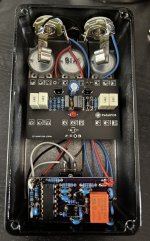
That same blog post also contained a beautiful picture of this flower, which I used as the basis of the graphic printed on the pedal. The text is rendered in a font called Eternal Call, which I thought gave a nice contrast of elegance to the otherwise dark symbolism. I'm not sure why I decided to go for the specific look that I did on the original pedal but I liked the vibe, so I ported it over to the new build, giving the Bloom [gain] control a red knob to match the graphics while leaving the others black. I used the A-5766 and A-5755 aluminum knobs from Tayda and was pleasantly surprised by how nice they are. If you look carefully, you'll notice the ghostly flower icon in the gloss layer around the LED, which I was hoping would sort of reflect the light from the LED (it does not, the LED is much too bright ). I am very satisfied with the result of the drill and print job and the price is good; it's a good tool to have in the box. I didn't use any fancy/mojo components, mostly just things I had on hand already. I also think this build is a serious improvement on my historically terrible spaghetti inside boxes that I'm ashamed to show.
So how does it sound? I like this pedal a lot. It's an extremely versatile and tunable fuzz with an enormous amount of available gain and a sometimes overwhelming low-end presence. One should note that the Bloom [gain] control does not have a bottom-out resistor so zero gain means zero signal (which is a bit weird). The Bias control lets it go from full, sustaining fuzz into gated velcro territory. The Head control adjusts the compression and "openness". Body allows you to tame some of that low end or let it go free for Big Doom Tones. Despite being such a simple circuit, all the controls have very distinct effects (though there is a level of interactivity, especially with Body, Head and the gain). It's quite quiet despite being such a high-gain circuit and I feel it sounds just as great on bass or guitar with no modifications between. Five-star build and an easy recommendation.
The first victim of this improvement quest is my Fuzzhugger Doom Bloom clone. Here's the original build:


I built this back in 2017 on veroboard, and honestly it's not that bad, but hindsight has made it obvious that there was absolutely no need for a 1590BB-sized enclosure for this tiny circuit, and the plain black Tayda enclosure and hand-drawn labels aren't the prettiest or most interesting look for a pedal that I really like. I of course used the PPCB Death Cap PCB for this build. Although I've used UV printing services before - namely AmplifyFun and Obscura MFG, both highly recommended - I had never used Tayda's service, mostly because I was sort of deterred by the strict rules, apparent specificity for Adobe Illustrator, and lack of support in preparing the artwork. Seeing how the service had improved over time and finding excellent tutorials from people on this forum detailing how Inkscape and Scribus could be used to effectively prepare artwork to Tayda's standards, I decided I'd use this build to test out Tayda's drill and UV printing service. So, through the magic of Retrospective, we obtain the New and Improved Doom Bloom:


I thought that "Doom Bloom" invoked imagery of some sort of poisonous plant, but one that looked beautiful despite its danger. An alternate interpretation might be a flower that appears before or after some great disaster, like the first new life after a wildfire, or something like that. Searching for something that reflected these ideas, I found a great blog post by Adrian Storey describing the symbolism of lycoris radiata, the red spider lily:
"Highly posionous, the bulbs contain toxic alkaloids that if ingested cause paralysis of the central nervous system and ultimately death. For this reason they were often, in pre cremation times, planted in graveyards to prevent wild animals eating the corpses."
"In Japanese mythology it is the flower that grows along the banks of the river that one must cross after death or the flower that grows in hell."
Perfect.
That same blog post also contained a beautiful picture of this flower, which I used as the basis of the graphic printed on the pedal. The text is rendered in a font called Eternal Call, which I thought gave a nice contrast of elegance to the otherwise dark symbolism. I'm not sure why I decided to go for the specific look that I did on the original pedal but I liked the vibe, so I ported it over to the new build, giving the Bloom [gain] control a red knob to match the graphics while leaving the others black. I used the A-5766 and A-5755 aluminum knobs from Tayda and was pleasantly surprised by how nice they are. If you look carefully, you'll notice the ghostly flower icon in the gloss layer around the LED, which I was hoping would sort of reflect the light from the LED (it does not, the LED is much too bright
So how does it sound? I like this pedal a lot. It's an extremely versatile and tunable fuzz with an enormous amount of available gain and a sometimes overwhelming low-end presence. One should note that the Bloom [gain] control does not have a bottom-out resistor so zero gain means zero signal (which is a bit weird). The Bias control lets it go from full, sustaining fuzz into gated velcro territory. The Head control adjusts the compression and "openness". Body allows you to tame some of that low end or let it go free for Big Doom Tones. Despite being such a simple circuit, all the controls have very distinct effects (though there is a level of interactivity, especially with Body, Head and the gain). It's quite quiet despite being such a high-gain circuit and I feel it sounds just as great on bass or guitar with no modifications between. Five-star build and an easy recommendation.

