Super '64 Amp/Cab-in-a-Box with Amentum Boost and UniCab

Danbieranowski

Well-known member
Moving along with my Amp/Cab-in-a-Box projects, I wanted to do something lower gain than last time (Sanguine into UniCab), so I decided to go with the Super '64. I wanted to have an easy way to hit it harder, so I decided to throw an Amentum in front of it. So the signal flow is Amentum into Super '64 into UniCab to provide that cabinet simulation so it can be plugged right into the computer or front of house, or (in the case of my demo video) an iRig into my phone. Then I can just capture the video and audio directly on my phone without having to worry about my crappy iPhone mic capturing the sound with decent quality. Plus I can do it silently, which is a nice plus for just sitting back and jamming or trying not to bum out my wife and dogs with my nonsense noise.

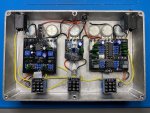
Overall the build was a lot of fun, albeit a little messy inside due to the wiring routing. I've never biased JFETs before, so after some searching on this board I was able to figure out what I assume was the appropriate way to do this. Another thread said to just bias them as close to 9v as possible for this board, so that's what I did. It does sound awesome, so I'm assuming that was right, although it does seem higher gain than I expected...

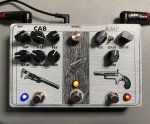
Gave it a kind of rustic look for fun, which I think turned out kind of cool.

Here's what it looks like on the outside:
IMG_8170.jpg

Here's what it looks like on the inside:
IMG_8167.jpg

And here's a direct-in demo of what it sounds like:

I really love the way it sounds with the gain pulled back and the boost engaged. The UniCab is a super handy circuit. It's not a perfect cab emulation of course, but it does make testing and doing quick demos infinitely more palatable and decent sounding. I would guess that an amp with minimal tone-shaping options could have this dropped into the FX loop to do some real nice work making the amp a little more magical. Anyways, party on everyone.
 
What they said! Inside looks plenty clean.
Only thing I'd add is heatshrink on the LED leads for insulation and strain relief.

I think I'm at a point now where I need to start heat shrinking the LEDs and the jacks. Just seems more future-proof and looks cleaner as well. Only issue is, I normally heat shrink via just using my soldering iron against the heat shrink itself (I don't have a heat gun or anything), and I'm a little worried itll melt the solder. Any tips on that?
 
I think I'm at a point now where I need to start heat shrinking the LEDs and the jacks. Just seems more future-proof and looks cleaner as well. Only issue is, I normally heat shrink via just using my soldering iron against the heat shrink itself (I don't have a heat gun or anything), and I'm a little worried itll melt the solder. Any tips on that?
You can use a hair dryer possibly, heat guns are pretty cheap

 
You can use a hair dryer possibly, heat guns are pretty cheap


I had no idea they made such convenient little heat guns. I thought they were all those hair-dryer sized ones. I love it. Thank you.
 
I just roll my iron quickly over it back and forth so the heat doesn’t build up in one spot. Haven’t had any desoldering issues, that usually only happens quickly if you’re using tin on tin!
 
What method do you use for the artwork it looks great

It was a raw enclosure so I just used a foam brush and brushed on some white on the top with long strokes so it looked kinda rustic. Then I used transparent vinyl sticker printer paper and designed a graphic, printed it out, sprayed it with a coat of poly, stuck it on the enclosure, drilled it, and sprayed it a few more times to seal it. Really easy overall.
 
It was a raw enclosure so I just used a foam brush and brushed on some white on the top with long strokes so it looked kinda rustic. Then I used transparent vinyl sticker printer paper and designed a graphic, printed it out, sprayed it with a coat of poly, stuck it on the enclosure, drilled it, and sprayed it a few more times to seal it. Really easy overall.
Thanks I will look into that transparent vinyl paper. Being new I'm looking for good ways for design, so far waterslide looked interesting and easy enough, but this vinyl sticker thing seems better.
 
Thanks I will look into that transparent vinyl paper. Being new I'm looking for good ways for design, so far waterslide looked interesting and easy enough, but this vinyl sticker thing seems better.

To me it's easier than waterslide. Just print it out, spray it with a layer of poly or lacquer to lock in the toner/ink, trim it out and stick it on making sure to rub it in so it sticks nicely everywhere. Then if you want to be thorough, spray the enclosure with a few layers just to protect it. I like to put a border on my designs that I can trim to. Just make sure your border is a little smaller than the enclosure so it'll fit. Try to print out a few designs at once so you don't waste the excess paper. I typically replicate my design a few times to make sure I have extras bc sometimes I screw up sticking it on and I redo it.

Here's where to get the paper (this says it works with inkjet and laser printers, I use a laser printer): https://www.amazon.com/gp/product/B002HJBH5E/ref=ppx_yo_dt_b_search_asin_title?ie=UTF8&psc=1
 
$20 for a Wagner seems like a good deal. Looking forward to slightly nicer builds!

Wagner Spraytech 0503038 Redesigned HT400, Dual Temperature Hot Air Tool 680 and 450 degrees, Shrink Tubing, Embossing, Craft Projects, sticker removal Heat Gun, Basic pack https://www.amazon.com/dp/B000X4SMRQ/ref=cm_sw_r_cp_api_i_h5SwFbHDNN32W
I got a heat gun in the embossing section of one of those Michael's crafts stores that is in every shopping mall in the country. I can't remember how much it was but I doubt it was $20 because I would have balked at paying that much. It's an undignified sparkly reddish-purple, but it works great for heat shrink tubing.
 
I got a heat gun in the embossing section of one of those Michael's crafts stores that is in every shopping mall in the country. I can't remember how much it was but I doubt it was $20 because I would have balked at paying that much. It's an undignified sparkly reddish-purple, but it works great for heat shrink tubing.

I ended up picking up the $20 Wagner and I'm okay with that cost since I honestly can't imagine needing to buy another one at any point unless it fails. I do wish it was a sparkly purple though.
 
Back
Top